Getting Started Fly Tying
Want to get started now without any more reading? Go through our online Basic Fly Tying Class. If you don’t already have the necessary tools and materials, a Fly Tying Tool Kit and Materials Kit for each pattern will provide everything you need to follow along in the videos.
Fly tying, for anyone who fly fishes, is a pastime that is greater than the sum of its parts. Not only do you create something that didn’t exist before, which is worth doing in itself, but you are able to take that thing and use it with skill to fool a fish into eating. A pile of fur, feathers and fiber on your tying desk is made into a fly, which is then presented to a fish. If everything goes well, the fish eats and is captured and released. What started back at your tying desk at home, hours or days before, is brought to completion on the water. And you got to take part in and enjoy the whole process. Catching a fish on fly is fun. It is that much better when the fish is caught on a fly that you tied.
Getting started fly tying is relatively easy. You can do it anywhere, the space requirements are minimal, and it can be done on a budget. Unlike other skills that require some proficiency before they are truly useful, a beginner with moderate dexterity will quickly be tying flies that will catch fish.
Why Tie Flies?
There are many reasons to tie flies. Some people tie in order to stay connected with fly fishing during times when they can’t be on the water. Some enjoy the creative side, designing new patterns, modifying old ones, and trying new techniques and materials. Others enjoy finding a pattern they like and tying it exactly to the designer’s specifications. We all appreciate the collection of newly constructed flies lined up at the end of a tying session, and the tug of a fish on the other end of the line that has been fooled by one of those flies.
A common goal of many who are just getting started tying flies is to save money. It is technically possible to save money by tying your own flies, primarily if you go through a lot of flies and fish just a few patterns. What happens with most of us is that, after filling our boxes with the flies we use on a regular basis, we wonder if a different color might work better, we see a new pattern we want to try, or we want to experiment with a new material. Before long, our small collection of tools and material has mushroomed, and we have a ten year supply of flies. Consider this fair warning.
Making a Start
 Learning to tie flies means developing a set of skills. When you learn to tie a new pattern, what you are really learning is the skills needed to put materials on a hook in such a way as to produce that pattern. The point is that the skills are independent of the pattern. Building on these skills, while gaining knowledge on the many fly tying materials available, will allow you to tie increasingly complex flies, as well as to simplify complex flies without sacrificing their effectiveness.
A little instruction when getting started fly tying is almost essential. Simple things, like putting a hook in a vise and getting thread started on the hook, are trickier than they look. Step by step instruction, whether it comes from an individual, a book, a website or online video, will get you started properly.
We offer in-person fly tying classes at our shop in Orlando and have also been working to create a library of fly tying patterns and techniques online. The same beginning instruction we offer in person is also available free as an online Basic Fly Tying Class.
The terminology can also be a bit tricky. Who, other than a fly tyer, would have any idea what it means to "palmer the hackle, trim and whip finish?" Our Fly Tying Glossary will help with terminology you may not understand.
We all start out in more or less the same way. The first time you sit down at your vise, you will learn how to adjust the vise to fit the hook you are using and how to clamp a hook in the vise. The next step will be to get thread started on the hook and get comfortable wrapping thread around the hook. After that comes securing materials onto the hook and getting them to stay where you want them. You will learn how to tie a quick half hitch to secure the thread at various stages along the way. At the end comes the whip finish, a final knot just behind the eye of the hook, that secures the thread in place before you trim it off. The last step is a bit of head cement on the final wraps. These simple skills will produce your first fly and will provide the basis for anything you tie in the future.
What You Will Need to Get Started
The list of items required to get started is relatively short. We recommend against most of the beginner kits available, which typically include not just inexpensive but cheap tools that will not work well or hold up to continued use. They are almost always put together with trout flies in mind, and won't include the materials you will need for saltwater and warmwater flies. You will be much better off spending just a little more money to get started with the right tools and materials.
We offer several fly tying tool kit options that, with the exception of the "starter" model, include a vise and tools that will last you for years. Pair a tying tool kit with one or more of the pattern oriented fly tying materials kits and you will have what you need to get started.
Essential Tools
Here is a list of the basic tools, with some explanation on each item. The last few on the list are not strictly "essential," but they are very nice to have.
Fly Tying Vise
 A fly tying vise must hold a hook securely while giving you room to maneuver materials onto the hook. Rotary action, allowing you to spin the hook around on axis, is very helpful but not a necessity.
Vises are available with pedestal bases and clamp bases. Clamp bases attach directly onto a table or other flat surface. They are very stable, when clamped down tightly, but can mar surfaces and can’t be used without a surface to clamp to. Vises with a heavy pedestal base can be placed anywhere. They are more convenient but much heavier and less suitable for travel. Most of the basic vises are only available with clamp bases.
If you aren’t on a tight budget, we recommend a rotary vise such as the very affordable Renzetti Traveler. If you are trying to save money, pick up a decent fixed angle vise and consider a rotary model for later. We offer several introductory vises and only stock those which we consider to be of good quality.
Scissors
Your first pair of scissors should be a good pair of straight scissors specifically intended for fly tying. You need to be able to make very fine and precise cuts, which is going to be difficult with the pair you pull out of your kitchen drawer. Spend the money to get a good pair. Cheap five dollar scissors will work fine initially but will soon lose their edge and the hinges may loosen up to the point where they are unusable. If you already have a kit with a cheap pair of scissors, don’t get rid of them. They will be useful for making coarse cuts and for trimming wire, monofilament and other materials that can damage scissors.
If you are tying warmwater or saltwater flies, get a fairly heavy-duty pair of scissors. If you’re going to be tying mostly small flies, a finer tipped pair may be more to your liking.
Bobbin
You will need a high-quality bobbin with a ceramic or agate tip insert to hold your thread. The insert will add to the cost but is important. Over time, your thread will cut a groove into most metal tipped bobbins, which will fray or cut your thread. The insert keeps this from happening.
Bodkin
The simplest tool on the list, nothing more than a needle at the end of a stick, the bodkin is also one of the most indispensable. It is used for positioning materials, picking out trapped hackle, fur and dubbing, applying head cement and dozens of other things.
Head Cement
More of a “material” than a “tool” but definitely a must-have. Head cement is used to lock the thread wraps at the head of a fly to keep the fly from unraveling.
Bobbin Threader
A bobbin threader makes the job or feeding thread through the barrel of a bobbin much more convenient.
Whip Finisher
While every fly tyer should learn to whip finish by hand, using a whip finish tool will give you excellent control and may speed up your tying.
Hair Stacker
A hair stacker is basically a cup with a wide top that is open on both top and bottom and fits down into a base. It is used most commonly with deer and elk hair. The idea is that you cut off a wad of deer hair, place it tip down into the hair stacker and tap the stacker on the table, your leg etc. The individual hairs shift down until the ends are all even and resting on the bottom.
If you’re going to be tying larger flies, get a big stacker. If tying trout flies (i.e. elk hair caddis) a smaller one will work fine. Keep in mind that it’s a lot easier to stick hair tip-down into a larger stacker so don’t buy one that’s too small.
Get Some Materials
 In addition to tools, you’ll also need to choose a fly to start with and get the required materials. You will find a list of materials in the recipe for whatever fly you are planning to tie. We often start introductory classes with a Crystal Schminnow, a saltwater cousin of the Wooly Bugger. This fly is both easy to tie and very effective. A recipe is below.
Crystal Schminnow
- Hook: Mustad 34007, #2
- Thread: Flat Waxed Nylon, white
- Eyes: Plastic mono eyes, large
- Flash: Flashabou Accent, pearl
- Tail: Marabou, White
- Body: Estaz, white or opalescent white
A fly recipe provides a list of materials in a standardized order, with materials generally listed in the order in which they are tied in. Not only does this recipe gives you a full list of materials needed, except for head cement, but it also provides a lot of information about how the fly is tied. While detailed tying instructions always make the process easier, a recipe, combined with a photo of the fly, will provide a proficient tyer with enough information to reproduce most flies.
When you are getting started, try to get materials as close as possible to what the pattern requires. A fly shop specializing in fly tying may not have the exact brand or color listed in the recipe but should be able to help you find a close approximation that will work just as well.
If you'd like to get started with the Schminnow, our Schminnow fly tying kit will provide you with all the materials you need. Basic instructions and information on the fly are available on our Tying the Crystal Schminnow page.
A First Fly
 The goal of tying your first fly should be to learn some very basic techniques. A usable fly is secondary. After your second or third attempt, you will likely have a fly that you will feel good about tying to the end of your line. Better, you will have a set of skills you can use going forward. If you start with the Schminnow you will learn how to tie in eyes, how to select a decent marabou feather, tie it in at the correct location, tie in flash, and wrap materials up a hook. Enough to be challenging but definitely manageable.
From there you will progress to flies requiring different materials and techniques and building on the skills already learned. A Clouser Minnow will teach you how to tie in lead eyes and how to choose, trim, even up and tie in bucktail. A Seaducer will teach you how to choose and match feathers, how to palmer feathers evenly around the hook shank, and how to secure them at the head. A gurgler will teach you how to trap and collapse foam, so it is tight against the hook.
When getting started, it is helpful to tie a variety of basic patterns, such as the ones listed above, and get comfortable with the techniques used before progressing to more challenging patterns. Once you are comfortable tying in marabou, making bucktail stay in the correct orientation, and gathering foam against a hook, you will be ready to tie with synthetic fibers like EP Fiber and Steve Farrar Blend.
It’s a Matter of Proportions
For the most part, the flies you tie will resemble living things: frogs, insects, fish, crabs, shrimp . . . All of these animals have distinct body parts arranged in specific ways. What makes a fish recognizable as a fish is a fish-like shape with the head at the front, tapering back to the tail. A baitfish fly does not need to look exactly like a fish in order to work, but the proportions should make sense.
When starting out, proportions are difficult to get right. At first, it’s enough to get the materials tied on in the correct order. As you improve, you will want to focus on tying materials onto the hook in the right location as well as giving them the correct shape and length. Sometimes you can just “eyeball” it and get the results you want, but your results will be more consistent if you apply some measuring techniques.
Hook anatomy and dimensions are ideal for noting material placement and for measuring proportions and are often referenced in step-by-step fly tying instruction. You’ve always got a hook available when tying a fly and hooks have specific parts and dimensions that don’t change much.
Hook Anatomy
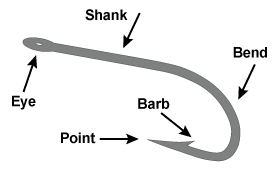
- Hook Eye – The eye at the front of the hook, used to tie your fly to the leader.
- Hook Shank – The straight part of the hook, directly behind the eye.
- Hook Bend - The curved part of the hook, starting at the end of the shank and ending at the point.
- Hook Point – The sharp “business” end of the hook, intended to penetrate a fish’s mouth.
- Barb – The angled back roughly triangle shaped protrusion behind they point, intended to keep the hook from slipping out of a fish’s mouth.
Hook Dimensions

- Hook Length – The length of the entire hook, from the eye all the way to the back of the bend.
- Shank Length – The length of the shank of the hook, from just behind the eye to the beginning of the bend.
- Hook Gap or Gape – Distance from the hook shank straight down to the tip.
- Eye Diameter – The distance from the outside of the hook eye straight through the middle to the other side. This is not often referenced in published instructions, probably because the eye diameter varies significantly from hook to hook. It is useful for determining how far behind the eye to tie in eyes and where to stop the thread.
You should also develop some of your own techniques for getting proportions right. For example, you may know from experience that a feather on a #1/0 Deceiver always hits the shaft of the vise in a certain place when the proportions are right. Vise proportions, marks you put on a vise, scissor blades, bodkin length, etc. can all be used effectively to measure proportions.
Common Fly Tying Problems
With few exceptions, we are all plagued with some very common problems when learning to tie flies. Here are a few to watch out for, along with advice on how to solve them.
Crowding the eye
Thread and tying materials tend to fill up a hook shank surprisingly quickly. It is very easy to “crowd the eye” by packing so much in at the head of the fly that it is difficult to complete the whip finish or, in extreme cases, to even fit your tippet through the eye of the hook. Leave more space than you think you’ll need. You’re better off with a bit of bare shank at the front than a fly that is unusable because the eye is buried. Pay attention to spacing and, once you figure out proportions that work for you try to use the same proportions on the next fly.
Using too much material
Most flies work better when lightweight materials are used to give an impression of bulk than when the materials are truly bulky. Remember how much of a given material you used on a fly. If it seems like too much, use less next time. If it helps, tape a representative amount of material to a piece of paper or the base of your vise so you can use it for comparison on your next fly.
Using loose thread wraps
Tight thread wraps make durable flies. If your eyes rotate on the hook or your bucktail falls out after the fly is finished, your thread isn’t tight enough. If you aren’t breaking thread occasionally, you probably aren’t pulling hard enough. Breaking your thread on purpose every once in a while will let you know how hard you can pull.
Using too many thread wraps
Lots of thread wraps do not make up for loose thread wraps. In fact, they make things worse. All loose thread wraps accomplish is to create a spongy mess that it’s difficult to tighten anything down on top of. A few tight wraps are all you need to hold most materials in place securely.
To sum it up, use the materials you need but no more, leaving plenty of space behind the eye, and secure your materials with a few tight thread wraps.
Tie Some Flies
The best way to improve your tying is to tie flies. Getting some instruction on a few flies will help you get started but to improve you’ll need to tie those flies on your own. Repeating the same fly at least three times will help you, and your fingers, learn the fly.
Muscle memory comes from doing the same things over and over. If you tie enough, the motions your hands go through when wrapping thread onto a hook, wrapping on eyes, holding materials against the hook and whip finishing will become second nature. If not, they will remain awkward so practice, practice, and practice some more.
You can improve your skills by learning new patterns that employ different techniques and incorporate different materials. At first, stick with relatively easy patterns that build on what you already know. If you want to learn a new technique, tie a pattern that uses that technique along with skills you already know, rather than a more difficult pattern where everything is new.
Fly tying is a hobby that you can enjoy and get better at for the rest of your life. Simple flies that require basic skills and take only a few minutes to tie will continue to work. For those who enjoy challenges and learning new things, there will always be a new material to try, new skills to learn, and new patterns to design.
Our website includes a growing library of patterns and techniques. The more basic patterns, including the Schminnow, Seaducer, Clouser Minnow, Gurgler and Fleeing Crab, include tying instructions and are all great patterns for a new saltwater/warmwater fly tyer to learn. For suggestions on becoming a better fly tyer, visit our Improve Your Fly Tying Skills page.
Our brands